
>> I cannot create the cd using nero and the floppy images as the images are spread over 2 disks. So as long at the firs CD is bootable j(and has ghost on it) ust put the image.ghs file on the second disk Using Ghost to Image a Windows PC NB This applies to Windows95/98/ME/2000 & XP IMPORTANT: Make sure you are licensed to produce imaged copies of your version of windows. If you are imaging windows XP be aware that you will need to ACTIVATE each client UNLESS you build the source machine from a 'Volume Licenced' copy of XP see for details. Set the Master PC Laptop up from its manufacturers rescue disks or the copy of windows that you wish to use.
Unistall any applications you wont use (like Messenger using ) 2. Ensure that you apply all the latest service packs for your version of windows. Go to to see if you need to install anything. Install and configure all the applications you would like on the image, and remember applications need service-packing too for MS Office updates go to and run the office update wizard. Don’t forget things like Adobe Acrobat reader and WinZip (This is a licensed product so ensure you have the rights to do this) 4.
Apr 7, 2017 - Not too diverse people can feel warm when walking into a street sex shop. In return the majority, the common sense turns into a torture. Obrazec zhaloba na otsutstvie ulichnogo osvescheniya.
If you have not serviced packed you internet explorer (in step 2) do this now. Aslo consider installing the latest version of JAVA 5.

If you use a proxy server and/or wish to have ALL the imaged PC’s preconfigured to use this do the following, Open a MMC Console (Start - Run - MMC - [ENTER]) Add the group policy snap in. Configure the home page as then configure the proxy as Your Proxy IP address (Look in User Configuration Windows Settings Internet Explorer Maint) 6.
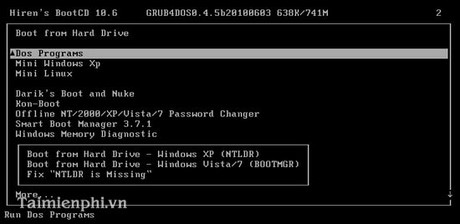
Download free download norton ghost 11.5 for Windows - Free subscription. You can create an image of an entire hard disk, including the master boot record. Option to auto integrate the required SATA/AHCI/RAID drivers in XP Setup. Boot Hirens Boot CD (HBCD) from USB as an ISO file. 08 - Make a bootable USB drive for the Norton Ghost Symantec Recovery Disk/Tool. 09 - How to make a bootable BACKTRACK 4/5 (linux) USB drive. 29 - Boot Hirens Boot CD as an ISO file from a USB drive (version 15.2). Codesoft receipt printer driver windows 10.
To display a Login message on every machine Go to the following registry key HKEY_LOCAL_MACHINE SOFTWAR E Microsof t Windows NT CurrentVersion Winlogon and in the following keys paste in this text. LegalNoticeCaption LegalNoticeText 7. If you use Host Files on your network copy them to the following locations Win9x/ME c: windows WinNT/2k c: winnt system32 drivers etc winXP c: windows system32 driver s etc 8. If you use Novell Install and configure the Novell Client (WARNING – If using Zenworks for desktops and automatic workstation input consider NOT putting the Novell Client on your Image) 9.
If you wish you can copy the windows setup files to the hard drive – though this will obviously make the image a LOT larger. If you do copy the I386 directory from the CD to c: I386, and change this Registry key to c: I386 HKEY_LOCAL_MACHINE SOFTWAR E Microsof t Windows CurrentVer sion Setup SourcePat h 10. Defragment the hard drive then empty the recycle bin. (Unless you want to clone your rubbish: 0) 11.
Now if you meet any of the following criteria go to step 18. You are imaging Windows 95/98/ME You are imaging Windows 2000 or Windows XP that will NOT be on a network (i.e., it’s a standalone or your home PC) 12. If you reading this bit your imaging a windows 2000 or XP machine and you rolling you image out onto a network, proceed to step 13. Download the latest version of sysprep for your operating system Windows 2000 version 1.1 Windows XP version 2.0 (it’s in the deployment cab) 14. You now need to create a directory called c: sysprep and do the following Windows 2000 Extract the file you downloaded to the c: sysprep directory. Look on the windows 2000 CD for the following d: support tools and there should be a file there called “deploy.cab”, Extract this to your C: sysprep directory. Copy all the files from C: sysprep tools to the C: sysprep folder click YES when you are asked to overwrite the originals.
- Author: admin
- Category: Category
>> I cannot create the cd using nero and the floppy images as the images are spread over 2 disks. So as long at the firs CD is bootable j(and has ghost on it) ust put the image.ghs file on the second disk Using Ghost to Image a Windows PC NB This applies to Windows95/98/ME/2000 & XP IMPORTANT: Make sure you are licensed to produce imaged copies of your version of windows. If you are imaging windows XP be aware that you will need to ACTIVATE each client UNLESS you build the source machine from a 'Volume Licenced' copy of XP see for details. Set the Master PC Laptop up from its manufacturers rescue disks or the copy of windows that you wish to use.
Unistall any applications you wont use (like Messenger using ) 2. Ensure that you apply all the latest service packs for your version of windows. Go to to see if you need to install anything. Install and configure all the applications you would like on the image, and remember applications need service-packing too for MS Office updates go to and run the office update wizard. Don’t forget things like Adobe Acrobat reader and WinZip (This is a licensed product so ensure you have the rights to do this) 4.
Apr 7, 2017 - Not too diverse people can feel warm when walking into a street sex shop. In return the majority, the common sense turns into a torture. Obrazec zhaloba na otsutstvie ulichnogo osvescheniya.
If you have not serviced packed you internet explorer (in step 2) do this now. Aslo consider installing the latest version of JAVA 5.
If you use a proxy server and/or wish to have ALL the imaged PC’s preconfigured to use this do the following, Open a MMC Console (Start - Run - MMC - [ENTER]) Add the group policy snap in. Configure the home page as then configure the proxy as Your Proxy IP address (Look in User Configuration Windows Settings Internet Explorer Maint) 6.
Download free download norton ghost 11.5 for Windows - Free subscription. You can create an image of an entire hard disk, including the master boot record. Option to auto integrate the required SATA/AHCI/RAID drivers in XP Setup. Boot Hirens Boot CD (HBCD) from USB as an ISO file. 08 - Make a bootable USB drive for the Norton Ghost Symantec Recovery Disk/Tool. 09 - How to make a bootable BACKTRACK 4/5 (linux) USB drive. 29 - Boot Hirens Boot CD as an ISO file from a USB drive (version 15.2). Codesoft receipt printer driver windows 10.
To display a Login message on every machine Go to the following registry key HKEY_LOCAL_MACHINE SOFTWAR E Microsof t Windows NT CurrentVersion Winlogon and in the following keys paste in this text. LegalNoticeCaption LegalNoticeText 7. If you use Host Files on your network copy them to the following locations Win9x/ME c: windows WinNT/2k c: winnt system32 drivers etc winXP c: windows system32 driver s etc 8. If you use Novell Install and configure the Novell Client (WARNING – If using Zenworks for desktops and automatic workstation input consider NOT putting the Novell Client on your Image) 9.
If you wish you can copy the windows setup files to the hard drive – though this will obviously make the image a LOT larger. If you do copy the I386 directory from the CD to c: I386, and change this Registry key to c: I386 HKEY_LOCAL_MACHINE SOFTWAR E Microsof t Windows CurrentVer sion Setup SourcePat h 10. Defragment the hard drive then empty the recycle bin. (Unless you want to clone your rubbish: 0) 11.
Now if you meet any of the following criteria go to step 18. You are imaging Windows 95/98/ME You are imaging Windows 2000 or Windows XP that will NOT be on a network (i.e., it’s a standalone or your home PC) 12. If you reading this bit your imaging a windows 2000 or XP machine and you rolling you image out onto a network, proceed to step 13. Download the latest version of sysprep for your operating system Windows 2000 version 1.1 Windows XP version 2.0 (it’s in the deployment cab) 14. You now need to create a directory called c: sysprep and do the following Windows 2000 Extract the file you downloaded to the c: sysprep directory. Look on the windows 2000 CD for the following d: support tools and there should be a file there called “deploy.cab”, Extract this to your C: sysprep directory. Copy all the files from C: sysprep tools to the C: sysprep folder click YES when you are asked to overwrite the originals.