
I got the following error While trying to install Cisco AnyConnect Secure Mobility Client Version 4.7.00136 predeploy. There is a problem with this Windows Installer.
Go to and log in with your NDUS.identifier and password—this is the same information used to log into Campus Connection and Blackboard. Click Start AnyConnect to go to the download page for the VPN Client 3. Click the download button to download the installer 4.
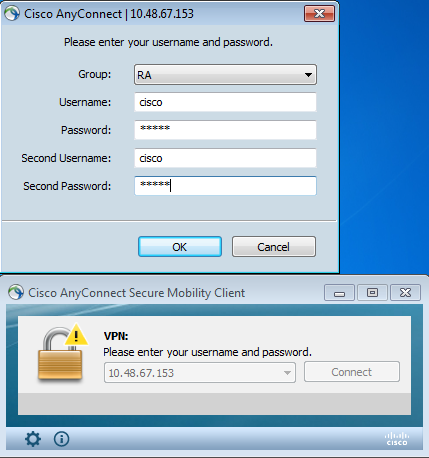
Follow the installer prompts to complete installation. Using VPN After Installation Sign-In 1. Open the Cisco AnyConnect Secure Mobility Client. 2. The login windows will appear. If prompted, enter undvpn.und.edu for the VPN server. Musixmatch plugin for poweramp download. NOTE: If you are logging into HRMS Employee Self Service to print W-2s, type: ndusvpn.ndus.edu for the server instead.
Select your group from the drop down menu. The Username and Password are your NDUS.identifer credentials. These are the same as for Campus Connection and Blackboard. 3. Click OK to connect. The status will then change to Connected to. Disconnect 1. To disconnect, go to the Cisco AnyConnect icon in your system tray or menu bar, and select Disconnect.

Windows 8 Installation Error If you are using Windows 8 and receive the error 'Failed to initialize connection subsystem,' follow these steps: • Go to the C: drive on the computer. • Open the Program Files (x86) folder. • Then open the Cisco folder, then Cisco AnyConnect Secure Mobility Client folder. Usb controller driver windows vista.
• Locate the file called: vpnui.exe. • Right-click the file and select Properties. • From the pop-up window, click the Compatibility tab. • Check the box under the Compatibility mode heading and select Windows 8 from the drop-down. • Click Apply, then OK. • Quit VPN and restart.
- Author: admin
- Category: Category
I got the following error While trying to install Cisco AnyConnect Secure Mobility Client Version 4.7.00136 predeploy. There is a problem with this Windows Installer.
Go to and log in with your NDUS.identifier and password—this is the same information used to log into Campus Connection and Blackboard. Click Start AnyConnect to go to the download page for the VPN Client 3. Click the download button to download the installer 4.
Follow the installer prompts to complete installation. Using VPN After Installation Sign-In 1. Open the Cisco AnyConnect Secure Mobility Client. 2. The login windows will appear. If prompted, enter undvpn.und.edu for the VPN server. Musixmatch plugin for poweramp download. NOTE: If you are logging into HRMS Employee Self Service to print W-2s, type: ndusvpn.ndus.edu for the server instead.
Select your group from the drop down menu. The Username and Password are your NDUS.identifer credentials. These are the same as for Campus Connection and Blackboard. 3. Click OK to connect. The status will then change to Connected to. Disconnect 1. To disconnect, go to the Cisco AnyConnect icon in your system tray or menu bar, and select Disconnect.
Windows 8 Installation Error If you are using Windows 8 and receive the error 'Failed to initialize connection subsystem,' follow these steps: • Go to the C: drive on the computer. • Open the Program Files (x86) folder. • Then open the Cisco folder, then Cisco AnyConnect Secure Mobility Client folder. Usb controller driver windows vista.
• Locate the file called: vpnui.exe. • Right-click the file and select Properties. • From the pop-up window, click the Compatibility tab. • Check the box under the Compatibility mode heading and select Windows 8 from the drop-down. • Click Apply, then OK. • Quit VPN and restart.